Pages

Showing posts with label home decor. Show all posts

Thursday, September 4, 2014

Craft Book Month Blog Hop

It's Craft Book Month and sweet Lindsay from Craft Buds asked me to participate again.

Craft Book Month

Last year, I fell in love with a book another blogger featured--Hoop-La by Kirsty Neale so I knew this year I wanted to feature something from it since this blog hop is where I first heard of the book.  It's a great book filled with "100 things to do with Embroidery Hoops" including tooth fairy pillows, bird mobiles, mixed media designs and actual embroidery designs.  Kirsty does a great job of explaining each project with helpful hints into the craft involved and cutesy ideas with each design.


With fall not too far away (I hope!!), I chose the apple hoop (pg. 18) to make to add to my fall decorating.


Awhile back my sewing room was a total mess bit messy and I accidentally stepped on and broke a wooden embroidery hoop that had fallen out of my embroidery supplies bag.  No worries, the only injury was to the hoop.  :)

I couldn't bear to throw it away though, so I saved it to make hoop art with at a later date.  Perfect for this project!  I heavily glued the hoop back together since I was going to cover it anyway and it wouldn't affect my project and set it aside to dry.


Usually I find inspiration in craft books, but don't necessarily copy straight from them.  I'll find something I like and use that as a starting point, but I loved that the book apple used both green and red buttons.  My kids are very specific about their favorite kind of apples, so I thought it would be cute to use both green and red, with a touch of yellow thrown in too.

I used both vintage and cheapy plastic buttons from Walmart on this project and found they worked together perfectly.  On a side note, I think this would be so fun to do with kids, using glue instead of needle and thread.  It's the kindergarten teacher coming out in me again--all that sorting and fine motor skill action.  lol

At any rate,  traced the pattern from the book onto my chosen background fabric and started laying out buttons until I was happy with the design.  Then I basted them down with some regular school glue to keep my design intact while I started sewing.

You can see here if you look closely that I didn't necessarily stay in my template lines--going for a more abstract apple to fit my buttons.  You can see the stem and leaf outlines as well.

I did sew each button down, but you could just use glue.  I like the extra hand-made touch the sewing gives and it didn't take long at all.  After I finished, I thought the bare spaces could use a little something so I added a few more buttons on a second layer to help.

Then I glued down small pieces of felt for the stem and leaf and the apple art was done.  But I still needed to cover that glued edge and make the hoop a little prettier so dug out some old red Homespun Yarn I've been hoarding and quickly wrapped the outer hoop.


And voila--done in no time at all.  It honestly took me longer to decide on a project and gather my supplies than it did to make this cute hoop that's a small, homey addition to my fall decorating.  I do think I'll go back and embroider some text, but haven't decided for sure what I'd like to write.  I'm thinking something in cursive to go with the flowy background--maybe just apples, maybe apples written in different languages...  Ideas??


I've teamed up with some fabulous bloggers who will be showing off their projects made from craft books, all month long!

Monday 9/1: Fabric Mutt / Lindsay Sews

Tuesday 9/2: Rae Gun Ramblings / Craftside

Wednesday 9/3: The Feisty Redhead / The Fabric Studio

Thursday 9/4: Marci Girl Designs / Small Town Stitcher

Friday 9/5: LRstitched / A Prairie Sunrise
Monday 9/8: Hopeful Threads / sewVery

Tuesday 9/9: 13 Spools / Lisa Liza Lou

Wednesday 9/10: Stitch This! / My Sewcial Hour

Thursday 9/11: The Littlest Thistle / Fabric Seeds

Friday 9/12: Sew Sweetness / Clover + Violet

Monday 9/15: Inspire Me Grey / amylouwho

Link Up

The girls at Craft Buds want to see what you're making too, so they're hosting a giveaway this month. Link up your craft book project at Craft Buds from your blog, instagram or Flickr account, and enter to win prizes. To participate in the month-long contest, just link up any project you've made from a pattern in a craft book. That easy! You'll tell us a little about the book, the project, how you personalized it, etc. Winners will be announced on Wednesday, October, 1!

Rules

1) One entry per person.

2) Your craft book project must have been completed in 2014.

3) Create a new blog post, instagram or Flickr photo (dated September 1, 2014 or later) and link back to Craft Buds/Craft Book Month in your post or photo description (tag #craftbookmonth for instagram). In your post or photo description, make sure to list the craft book you used and provide a link if possible.

4) All winners chosen via Random.org. Some prizes available to international winners, so please join us!


Visit Craft Buds and link up your craft book project during the window of Sept 1-30 and you'll automatically be entered to win some fantastic prizes from the Craft Book Month sponsors!

Craft Book Month at Craft Buds

Saturday, February 15, 2014

The Rising Sun Challenge

Nat and Lucy are so good about giving out interesting topics for Le Challenge each month.  If you've never heard of this, it's a blog that two friends started with the sole purpose being to challenge themselves and friends to think of and make something new each month based on a theme.  There's no competition, it's open to anyone who wants to participate, and one lucky participant is awarded a gift each month based on a random drawing.

Le Challenge

This month, the girls chose "The Rising Sun" which I thought it was an interesting starting point because there were so many places to go with that topic.  I searched rising sun quilt patterns and there were plenty of really neat blocks that would make awesome quilts.  But I didn't leave myself enough time for that.

So I thought about the suggestions they and their guest bloggers had given--Japanese-influenced designs for garment sewing or quilting; Japanese fabric designers from traditional designs to Lecien and kawaii cuteness; Sashiko or even just sunny projects.

My ever growing "to-do before I die" list grew leaps and bounds.

But in the end, I googled Rising Sun images and I knew what I was going to make.

I found this image on zazzle's web site and loved the combination of the rising sun and the clamshells, a traditional quilting design.
But I didn't love the red.  It was WAYYY a little too Japanese for my style and wouldn't fit into my decor. So I changed it.

I have always loved the song You are my Sunshine and often sang it to my children when they were younger.  I thought the lyrics would fit well here, so I used my favorite colors, a great, fun font and here you go:


I created an aqua background and then put a somewhat-transparent layer of gray canvas over it to soften the aqua and bring the gray theme into play.


Then I added the lyrics to the song in yellow and worked on the graphic.  I deleted all of the white background and then changed the entire graphic to be yellow.  After duplicating the image, I changed it to gray and then erased the top layer (the gray) away from the "rising sun" portion of the image.

Do the pics look a little fuzzy to you?  They don't at all in my editing software but do a little in blogger...weird!
Then I printed it in a 5x7 size and popped it in this frame.  I will DEFINITELY be painting the frame, but it's what I had handy.  I'm working on building a gallery wall in my living room of pictures, inspirational quotes, and images that are important to our family or just make me smile.  The photos are all framed in black, but I'm hoping to bring color in through the other items.

I think this will be a perfect addition.  What do you think?

Thanks girls for the challenge!  It was fun.  :) Head over and see what everyone else created this time.  :)


Saturday, September 7, 2013

Craft Book Month Blog Hop--My Fall Patchwork Pillow

Hello to any new readers!  I'm Kelli and welcome to my little corner of the world.  I was so excited when Lindsay asked me to participate in this blog hop.  I have a small stack of crafty books just waiting for an excuse to make something out of them!

Craft Book Month

I chose to work out of the book Pretty in Patchwork Holidays by John Q. Adams.

Pretty in Patchwork Holidays

 I bought this book last year and then promptly got busy and forgot to make anything out of it.  Not this year, my friends.  This book is filled with great projects that are both cute and fun to decorate your home with.

I chose to make the Holiday Surprise Reverse Applique Pillow by Angela Mitchell who is a star in her own right.  She's got such a great sense of style that I was sold at once.

Early pics!
photo found here

Only one problem--it's not even pretending to be time for Christmas decorations.  I mean, it's 91 degrees here in Florida this afternoon.  And I wanted something I could enjoy now!

So, I took Angela's pillow and modified it.  I changed the Christmas tree template to a leaf and I changed the green patchwork to more fall colors.


I love it!

I'd done reverse applique before and it really is quite a simple concept, but the results are stunning!  If you've never done reverse applique, you layer your base fabric over your design (in this case the patchwork) and then after sewing your desired shape, you cut away the base fabric to reveal your design.


I keep a scrap bag with just 2.5" squares and strips in it, so I dug through it to find scraps that screamed fall to me.  Originally, I added a few more colors in but my helpful husband guided me toward more yellows and oranges.  He wasn't a fan of the turquoise at all, but I think it makes the other colors pop so well and being perfectly honest--it's my favorite color so I try to add it in any place I can.  ;)


I mean, it's going on my couch, right??  Why not add in something special?


I only have one problem with this pillow...now I want more!  I want to line my couch with fall-inspired pillows!!  This little beauty needs some friends.  He's so lonely down there on the end of the couch by himself.

So I'm off to dig through the scrap bag again to make him some friends.  But rest assured, come winter, I'll be making this pillow again only using Angela's Christmas tree design...finally!

The girls over at Craft Buds are spreading the Craft Book love this month featuring different bloggers each day and offering prizes for anyone who links up a project made from a craft book this year!

Blog Hop

Week One

Monday 9/2: Fabric Mutt / LRstitched

Tuesday 9/3: Stitch This! The Martingale Blog / Stitched in Color


Wednesday 9/4: Fabric Seeds / Pile O Fabric

Thursday 9/5: The Feisty Redhead / Rae Gun Ramblings

Friday 9/6: Sew-Fantastic / Clover + Violet

Saturday 9/7: A Prairie Sunrise / Small Town Stitcher

Week Two

Monday 9/9: Hopeful Threads / Go To Sew

Tuesday 9/10: The Sewing Rabbit / Sewing Mama RaeAnna

Wednesday 9/11: Marci Girl Designs / imagine gnats

Thursday 9/12: Sew Sweetness / amylouwhosews

Friday 9/13: Lindsay Sews / 13 Spools

 Saturday 9/14: Inspire Me Grey / Angela Yosten 

Week Three
Monday 9/16: Sew Very / Craftside
Tuesday 9/17: The Littlest Thistle / CraftFoxes


9/1-9/30: Link up your craft book project at Craft Buds from your blog or Flickr account, and enter to win prizes. Winners will be announced on Tuesday, October, 1!

To participate in the month-long contest, just link up any project you've made from a pattern in a craft book. That easy! You'll tell us a little about the book, the project, how you personalized it, etc.

Rules
1) One entry per person. 

2) Your craft book project must have been completed in 2013. 

3) Create a new blog post or Flickr photo (dated September 1, 2013 or later) and link back to Craft Buds/Craft Book Month in your post or photo description. In your post or photo description, make sure to list the craft book you used and provide a link if possible.

4) All winners chosen via Random.org. Some prizes available to international winners, so please join us!


Prizes

Visit Craft Buds and link up your craft book project during the window of Sept 1-30 and you'll automatically be entered to win some fantastic prizes from the Craft Book Month sponsors!


No time to make a project? You can also follow Craft Buds all month long for your chance to comment and win some new sewing and quilting books for your library.


 Craft Book Month at Craft Buds


Saturday, September 8, 2012

I actually finished something!!


Aaah...it feels so good to actually have a finish to brag about!!!  And by brag I mean that I actually finished something and not that it is so great.  Let's just clarify that right off the bat....  ;)

I mentioned last week that I was designing and making a big doggy pillow for our sweet girl, Belle.  Well, as I have also mentioned MANY times in the past, I am very aware that one of my strengths in life is not spatial reasoning or designing how something comes together.  I just don't see it.  Now, following a pattern I can usually do--but making up my own, not so much.

BUT, I persevered and DIY'ed this baby up!  But let's back up.  Last week, I left you with this:


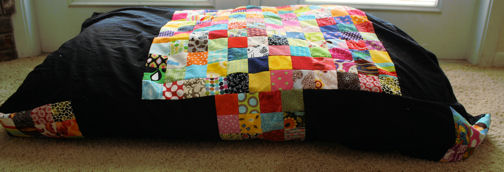
Since then, I sewed all of those squares into 8" blocks (finished size) leaving me with 15 total including the 10 I already had.  I knew I wanted this pillow to be roughly 3 feet by 4 feet since Belle is a big dog so I decided on a 2-foot wide section of patchwork along the top.  But I didn't want to put anything together until I got the foam insert.

And while I was in the big city shopping with my sister, inspiration struck--instead of buying that EXPENSIVE foam, I could use cheap pillows from JC Penney!  I bought 3 king-sized "firm for side sleepers" pillows and hand-stitched them together when I got home.  So I got the comfort of a soft pillow with some firmness to make it easier to get up and down for Belle.  Then I took an old mattress cover we had with a plastic lining (since she has incontinence issues...) and covered all 3 pillows with it.  I just handstitched this along the bottom to keep it in place.  Sorry, I forgot to take a picture...


The 3 pillows together ended up measuring in at 32" x 48" which was perfect because I could use my 8" squares without any modification.  So--I sewed the squares into 4 rows of 3 squares each.  That made a patchwork column of 24" x 32".  So I sewed a 12" rectangle to either side and I had my top done.  Then I made a zipper strip to act as the side of the pillow.  The biggest zipper I could get at Walmart yesterday was 30" which made for some interesting times getting the finished product around these pillows but I said a bad word and threw it at the wall persevered.

Since I had 3 patchwork squares left over and some black strips left over from the top, I used these randomly to make the side strip long enough.  Once I got that baby sewn to the top, I realized I was out of black fabric...

But I wasn't going to give up this close to victory so I dug around in my stash for something ugly enough I didn't mind losing it to the bottom of a doggy bed and came up with a big piece of mottled lime green fabric that I think may have once been curtains in my sister's old classroom..  Anyway, it was the perfect size for what I needed and I quickly pinned and it sewed it together.

Now...as I mentioned before, I'm not the best at designing.  Somewhere along the way my math got a little hazy and the side strip ended up WAY too big for the bottom piece and I had to add some creative folds and tucks (i.e. cramming the fabric neatly into the necessary space) along the back where I figured no one would notice.   And you can see that it doesn't fit exactly snug around the edges of the pillow form, but I'm down with that.  It is for a dog after all!


But, Belle doesn't seem to mind.  She was so funny when Chris called her over to the pillow and told her to lay down because she didn't seem to want to get on it and mess it up.  She kinda put her front paws on it and left her back end hanging off the side.  Well, her back end (and the incontinence) is the whole reason we want her to have a special place to lay, so we had to convince her to get all the way on.  But, once she got the hang of it, she looked pretty comfortable... what do you think?

Oh, on a side note--I sprayed both the inner pillow section and the outer cover repeatedly with ScotchGuard for fabric in hopes of keeping the pee that she will drip out of the pillows.  I am hopeful that this along with regular washing of the outer layer will prevent any pee and dirt from creeping into the pillows and stinking them up.

Belle says "How can you not love this face???"


Tuesday, December 20, 2011

Guest Post for Jenny

This is the post I did for Jenny over at her Sew Crafty Christmas Event.  If you clicked over yesterday, this is just a repeat of that.  I just wanted to share it here for everyone who didn't and so I have it in my archives.  Happy Monday everyone!

When Jenny asked me to be a part of her Sew Crafty Christmas event I thought I'd show y'all a craft I do with my children every year at Christmas.  It's easy and there are about a million different tutorials for versions of this on the web.  But, I'm going to show you this most basic version and you can take it from there.  My kids are 5 and 7 and we've been doing this together for a few years.  Emma, my 7-year-old can pretty much do it on her own now, but Oren, my 5-year-old still needed guidance. So it is definitely a craft you and your kids can grow into and make a tradition.

We're going to make some fabric-covered Christmas trees!


You'll need styrofoam cones (of any size, we like to mix it up), fabric cut into small squares and rectangles (I just hack away...bigger shapes fill the tree faster, little ones give you more control), decoupage glue (we use Mod-Podge mixed with some water) and a paint brush.  I'd also recommend some newspaper so you don't glue the trees to your table, but that's up to you.  ;)
And here we go:

1.  Lay out all of your supplies and start gluing.  I usually put a little glue on the tree, stick the piece of fabric down and then dab a little glue right over the fabric.  Then you can just overlap pieces until the tree is covered!

This little tree is in progress.  See how you just glue down the pieces on top of each other?   That way you make sure to cover everywhere.

2.  Now for that pesky top...there are two ways to conquer this.  You can start here so that the folded-over edges will be covered, but it can be tricky for little fingers to keep the edges smooth, or you can end with the top piece.  I've done both.  For these trees, I glued down the top for them.  The key is to make snips along the fabric that overhangs the top flat area.  Then these snipped pieces can be folded over and arranged to lay flatter.

Here I started with the top and glued it down well before going down the sides.

3.  What I love about this craft is that it doesn't require perfection.  This is a craft you are making with your kids and (from a distance at least!) they'll look just as good if they're perfectly flat or a little bumpy.  Now, if you're a perfectionist, you can certainly make these yourself and they'll look great.  In our little "forest" there are some I've made with the kids and some I've made alone.  I choose to let the happy memories of time spent together haze out all of those bumpy-edged trees from years past.  :)


4.  But fabric is not your only medium to work with.  We've also made yarn-covered trees


and tissue-paper trees.


And really, the sky is the limit here.  I've seen these trees made with ruffled fabric, scrunched up balls of tissue paper, sequins, etc.  You could use newspaper or sheet music for a vintage look.  You could use pins with jeweled heads or beads to be ornaments on your trees.  I mean, what I'm showing you is just the first step...where you go from here can be all you!

Thanks again to Jenny for letting me come over and hang out today!  I wish each of you the very Merriest Christmas and a happy heart this holiday season.  Now get to gluing you up some Christmas trees and start your own Christmas forest filled with memories of time spent together!!


Friday, September 23, 2011

Celebrate a little Color

I finished my patchwork table runner.  I told Chris I should call it a table blanket, because it's pretty big.  In fact, I thought about just adding a couple of borders and making it a lap quilt, but I wanted a table runner, so a table runner it is.


  I found a bundle of Farmdale by Alexander Henry Fabrics online.  All of the fabrics were different lengths, but it was plenty for what I was looking for. (Still have leftovers!!!)   I love this line--I love the apples, the cross-hatching, and all of the different colors.  I threw in some coordinating colors of both prints and a solid I already had and started cutting.  I just wanted a simple patchwork design so the fabric designs spoke for themselves.  Plus I didn't want to cut anything too small.  I wanted all of those apples to show!


When it came time for quilting, I thought about doing a stipple or loopy design, but since I loved the cross-hatching, I went with that.  Plus...EASY!!  I didn't even need a walking foot.  I just kept my regular foot on and went for it.  I quilted a straight line 1/4 inch from each seam and then another line 1/4 inch from each line.  So each seam got two lines on either side.  I didn't get too worried if my lines were perfectly straight or exactly 1/4 inch from the seam or each other.  The lines on the fabric are deliberately imperfect, so why not embrace it?


  And that backing fabric...it's vintage from my Grandma's house.  I brought home a suitcase-FULL of fabrics that were either her's or my Great-Grandma's last October and this was one of them.  It's a thick linen-like cotton blend.  I love the color and how I could easily just turn the table runner over and use the back with it's great quilted design when I've moved my decorations toward Thanksgiving!

  As for binding...well, I went through my stash and chose this dark brown.  It matched my quilting thread and I thought it tied all of the fall colors back together.

  Overall, this was a great quick project.  It's nice to look at my living room and see something handmade.  And even better...I've got leftover charm squares to make into pillows when my slipcovers arrive.  That  plaid on the couches is going to take a little hibernation while I give some slipcovers a try.  I picked out those couches when we built our home 7 years ago, and while I still love them, they are awful hard to make pillows for.  And we all know how much fun pillows are to make!


  I hope y'all are having a great Friday and have a fun weekend planned.  I've got a bridal shower and the Gator game tomorrow, but otherwise I plan on spending some time sorting out my knitting needles and seeing what yarn wants to jump on them and what it wants to become...

  I'll be linking up this project to Rachel's Celebrate Color home decor contest for September.  There are some AWESOME projects linked up in all of the categories, so take some time this weekend to visit Rachel and then all of the amazing people showing off their colorful projects.  Wow!

Friday, April 22, 2011

A Good Day

  Today is a good day.  We spent the day relaxing, picking up the house, creating, protecting our "dinosaur eggs" which are really just acorns in a mason jar...don't even ask!  We made chocolate birds' nests, swam and enjoyed hamburgers out by the pool.  And what makes it an even better day is remembering our Savior who on this day sacrificed himself for our salvation all because he loved us and his Father, our Father in Heaven.

  I had a friend ask me if I could make a hairbow for her daughter to wear Sunday and although you know how I feel about hairbows (I think I like making them until I remember halfway through that I really hate it!), I agreed.  She said the dress is yellow, black and white, so this is what I came up with out of what I had at the house.  I haven't seen the dress, so I have no idea if this at all goes with it, but here it is nonetheless...


  I also worked on Emma's bow holder today, which is kinda funny since I did two projects involving bows today completely on accident.  I took the purple-painted cork board and glued ribbon strips onto it.  Then I took some headpins and beads I bought when I thought I might like jewelry making (about as much as hairbows) and made hooks for her ponytails.  Since she has a bunch of headbands, I spray painted and then inked up some big plastic buttons I had and sewed them down with embroidery floss and a strong needle.  That way the headbands can hang on here as well.  I decided to back the whole piece with felt in hopes that will help it stay sturdy and strong.  This entire project came from rejects in my craft room, so I'm fairly happy with how it turned out...  What do you think?

After loading it up, I think she might need two together to hold it all...good thing I've got extras of  it all!!

   I hope everyone reading this has a wonderful Easter weekend, full of smiles, bright colors, and the joy of a wonderful Savior who sits on the right hand of God waiting to welcome us all to Heaven one day.

Tuesday, January 18, 2011

I LOVE long weekends!

I am pleasantly surprised at how quickly everything was asked for after my last post.  I'm headed to the post office Wednesday morning to mail off all of the goodies and will be glad to see them headed to their new homes.  Now I'm off to make new scraps and find new ways to use what I have. 

  So this is what I've been up to during the long weekend.  Monday was cold, rainy, and an inside-kind-of-day, so we had plenty of time to craft and play.  I saw the idea for little love pots on Heather's blog and knew I HAD to make them.  They're simple, easy to craft, and a cute mantel addition for a Valentine's Day display.  I, of course, used the supplies I had on hand, switching out the spray paint for craft paint and the stickers for letters I cut on the silhouette and ran through the xyron machine.  I also used red tulle for the red pots and the leg of a pair of pink pantyhose (leftover from a project like 3 years ago...I told you I was a packrat) for the pink pots.  I've had a bunch of my cobalt and milk glass along the mantel, but I am making the switch to Valentine's Day this week. 

These are sitting on my TV for now until I decide on the mantel decorations...
   On Monday, we got out Emma's science kit that she got for Christmas (her goal is to be either a rock star or a scientist when she grows up...) and played with color.  It's really too basic for her, talking about combining primary colors to make secondary colors, but because it involved dying wather and using it in "test tubes" she was totally into it.  We then added these little "polymer something-or-others" to the colors we made and they are slowly growing into crystals.  They looked like jello forming yesterday and now we are anxiously waiting for the water to fully evaporate to let them harden up.  My hope is that they'll be strong enough that we can string them for a bracelet when they're done, but that remains to be seen.  Emma and Oren are mesmerized by it all one way or the other.

Even I enjoyed checking on the crystals to watch their growth.  This was about 3 hours after we dropped the polymer thingies in.  They look about the same this morning, but with less water.  I told Em it was another experiment to see how long it took to dry out.  She said she just wanted them hardened now!
  But seeing that cup of red water on the counter made me impulsively decide to get out the gajillion coffee filters we have (neither of us drink coffee, but we keep them for company) and let the kids use the red water and pipettes to dye a bunch of the filters.  Then we'll mix them in with white ones to make a coffee filter wreath (if you haven't seen these, look here, here or here for a start...)  They thought it was brilliant and I thought it a great way to continue the science experiment into a crafty project.  Apparantly, Emma sees the world for a science experiment and I see it for one big crafty adventure.  We are so alike in some ways, and so different in others...


This morning we're off of school for a teacher workday (don't miss that part of teaching), so we're going to run some errands and then finish up our wreath before we get the rest of the Valentine's decor out.  Oren couldn't care less, but Emma LOVES Valentine's Day and everything that goes along with it. 

Hope everyone is staying warm and dry.  It's so foggy outside right now that the kids thought it was pouring rain outside.  Shopping should be fun this morning.  Especially since the mall is a 45 minute drive from here.  Oh well, it'll make coming home seem that much better when we're done!

Thursday, December 9, 2010

Whew! Glad to check this one off the list!

Remember those stockings I said I was working on?  And that there were 6 of them?  And that someone was paying me to make them?  Well--those 6 stockings almost flew out a window today along with my sanity!

Have you ever had a project that just seemed doomed from the start?  That each step seems to have some complication with it?  And that if it was just for you, something you'd just decided might be cool, you'd have chucked it out or put it in the UFO (unfinished object) pile never to be seen again?  That has been my day today.
My plan was to have them all from different fibers, but tied together with the embroidery.  She's got a snowman theme with her decorations.
 Today was the first day in about a week that I had no commitments...no Santa Shop, no volunteering in Emma's classroom, no family obligations.  I had planned on catching up on housework (and believe me, that's a project in itself) and sewing the day away.  I made a checklist in my head of all the things I wanted to accomplish.  I was so glad to drop the kids off this morning with no makeup on and jogging pants and come on home ready to start my day...and then the stockings sucked me into their black hole of misery...

This one was from an old sweater coat I NEVER wear
But after about 3 hours of butting my head into the wall I am finished and they are done and I don't care anymore.  See, I decided these stockings should have a cuff on them when my other set did not.  I mean, the stockings I made for my family had cuffs, I knew how to do it.  And I thought with all of the fabric choices for these, cuffs would be the easiest way to add names and tie them all together.  WRONG!!!!!!!!!!!

This one's from an old corduroy skirt.  It was a dream to sew--putting the cuff on was another story!
First, I assumed I was right with my measurement instead of measuring twice and made a cut that turned out to be VERY wrong and I had to piece all of the cuff backs together.  Then, some of the cuffs didn't want to fit into the stockings they were made for.  And the pompom trim that I added to the girly stockings wanted to fight with me...literally, we almost had a boxing match, but I yelled loud enough that the trim got scared and mostly cooperated.  Good thing too, cause I would have totally KO'd it today.  I wasn't going down without a fight.

This one is some flannel I picked up because she wanted a Christmas-y theme and I knew she'd like the softness

Oh, and did I mention that my sewing machine and I have a love-hate relationship to begin with?  As in, it loves to break down on me and I HATE it when it does that!  But the bobbin case only jumped out a couple of times today and once was because one of the stockings was fleece and I needed to clean out the bobbin area...you know after 30 seconds of sewing with it.

This one is from a fleece blanket--actually a flag theme, but I cut the stocking on the bias so it would resemble candy cane stripes.
So...the stockings are done.  They are not my best work and I am hoping that my friend, not being a sewer, doesn't notice the MANY flaws involved.  And hopefully her mother, who does sew, won't look to closely either!  But I did cut her a pretty good deal to begin with considering she needed 6, so I'm not feeling too bad.  Because, honestly, the stress and aggravation these things caused me today--they should be about $50 each!!!  And no one in their right mind would pay $50 for any of these things.

This one's just plain old quilting cotton...I was running out of ideas!  ;)
I will say, that the one I saved for last was Tyler's--the quilted one.  It was not only the easiest to put together, but my favorite when all was said and done.  Go figure.  I didn't think it would be difficult, but because of the quilting on the top, I'd saved it so I could do all of my straight sewing and then put on my free-motion foot.  But after seeing how this day was shaping up, I left on my normal, regular sewing foot and just went for straight lines.  I didn't really have a pattern, I just went for it.  And now, I think I may do quilting like that for ours when I re-do them.  And no, that won't be today!  ;-)

This is a thin, gauzy green that I doubled and put some thin batting behind and then quilted with red lines.
And now that I've had a deep breath and a good rant, I am feeling more composed and ready to begin another project.  I can't decide between folding Mt. Laundry (seriously--like 4 baskets full and I'm just halfway through the washing) or cutting out the fabric for a newsboy cap for my Dad for Christmas.   Hopefully I can get both and a few other things done before Chris and the kids get home.  But first, I'm taking a chocolate break!