Pages

Showing posts with label featured. Show all posts

Thursday, September 4, 2014

Craft Book Month Blog Hop

It's Craft Book Month and sweet Lindsay from Craft Buds asked me to participate again.

Craft Book Month

Last year, I fell in love with a book another blogger featured--Hoop-La by Kirsty Neale so I knew this year I wanted to feature something from it since this blog hop is where I first heard of the book.  It's a great book filled with "100 things to do with Embroidery Hoops" including tooth fairy pillows, bird mobiles, mixed media designs and actual embroidery designs.  Kirsty does a great job of explaining each project with helpful hints into the craft involved and cutesy ideas with each design.


With fall not too far away (I hope!!), I chose the apple hoop (pg. 18) to make to add to my fall decorating.


Awhile back my sewing room was a total mess bit messy and I accidentally stepped on and broke a wooden embroidery hoop that had fallen out of my embroidery supplies bag.  No worries, the only injury was to the hoop.  :)

I couldn't bear to throw it away though, so I saved it to make hoop art with at a later date.  Perfect for this project!  I heavily glued the hoop back together since I was going to cover it anyway and it wouldn't affect my project and set it aside to dry.


Usually I find inspiration in craft books, but don't necessarily copy straight from them.  I'll find something I like and use that as a starting point, but I loved that the book apple used both green and red buttons.  My kids are very specific about their favorite kind of apples, so I thought it would be cute to use both green and red, with a touch of yellow thrown in too.

I used both vintage and cheapy plastic buttons from Walmart on this project and found they worked together perfectly.  On a side note, I think this would be so fun to do with kids, using glue instead of needle and thread.  It's the kindergarten teacher coming out in me again--all that sorting and fine motor skill action.  lol

At any rate,  traced the pattern from the book onto my chosen background fabric and started laying out buttons until I was happy with the design.  Then I basted them down with some regular school glue to keep my design intact while I started sewing.

You can see here if you look closely that I didn't necessarily stay in my template lines--going for a more abstract apple to fit my buttons.  You can see the stem and leaf outlines as well.

I did sew each button down, but you could just use glue.  I like the extra hand-made touch the sewing gives and it didn't take long at all.  After I finished, I thought the bare spaces could use a little something so I added a few more buttons on a second layer to help.

Then I glued down small pieces of felt for the stem and leaf and the apple art was done.  But I still needed to cover that glued edge and make the hoop a little prettier so dug out some old red Homespun Yarn I've been hoarding and quickly wrapped the outer hoop.


And voila--done in no time at all.  It honestly took me longer to decide on a project and gather my supplies than it did to make this cute hoop that's a small, homey addition to my fall decorating.  I do think I'll go back and embroider some text, but haven't decided for sure what I'd like to write.  I'm thinking something in cursive to go with the flowy background--maybe just apples, maybe apples written in different languages...  Ideas??


I've teamed up with some fabulous bloggers who will be showing off their projects made from craft books, all month long!

Monday 9/1: Fabric Mutt / Lindsay Sews

Tuesday 9/2: Rae Gun Ramblings / Craftside

Wednesday 9/3: The Feisty Redhead / The Fabric Studio

Thursday 9/4: Marci Girl Designs / Small Town Stitcher

Friday 9/5: LRstitched / A Prairie Sunrise
Monday 9/8: Hopeful Threads / sewVery

Tuesday 9/9: 13 Spools / Lisa Liza Lou

Wednesday 9/10: Stitch This! / My Sewcial Hour

Thursday 9/11: The Littlest Thistle / Fabric Seeds

Friday 9/12: Sew Sweetness / Clover + Violet

Monday 9/15: Inspire Me Grey / amylouwho

Link Up

The girls at Craft Buds want to see what you're making too, so they're hosting a giveaway this month. Link up your craft book project at Craft Buds from your blog, instagram or Flickr account, and enter to win prizes. To participate in the month-long contest, just link up any project you've made from a pattern in a craft book. That easy! You'll tell us a little about the book, the project, how you personalized it, etc. Winners will be announced on Wednesday, October, 1!

Rules

1) One entry per person.

2) Your craft book project must have been completed in 2014.

3) Create a new blog post, instagram or Flickr photo (dated September 1, 2014 or later) and link back to Craft Buds/Craft Book Month in your post or photo description (tag #craftbookmonth for instagram). In your post or photo description, make sure to list the craft book you used and provide a link if possible.

4) All winners chosen via Random.org. Some prizes available to international winners, so please join us!


Visit Craft Buds and link up your craft book project during the window of Sept 1-30 and you'll automatically be entered to win some fantastic prizes from the Craft Book Month sponsors!

Craft Book Month at Craft Buds

Saturday, October 20, 2012

A gift for a dear friend

**Jennifer, who is awesome and if you don't already follow her you should, featured me yesterday for her Follower Friday!!  Go check it out if you want and show her some love.  And p.s.  I completely forgot to fill out the questionnaire until the day before it was due so I answered the questions in about 5 minutes.  Yep, I'm that good...someone wants to let me talk about me and I procrastinate.  WHAT??  ;) **

Photobucket

Awhile back I showed a preview of a baby quilt I was making for a good friend.  And the quilt has been delivered, so I'm finally back to show it off!!

My friend Toni who is really like my long-lost twin added to their family this August with a sweet baby girl and I wanted to show them some love.  I knew Toni had said she was thinking of an orange and pink color scheme for baby Jill's room, so I went with that.


As I was considering ideas, I remembered the string blocks I'd made awhile back that I hadn't used just yet for any particular project and I busted them out.  And the colors were perfect.  Orange, pink, white and yellow.  :)  I had enough to make the whole quilt out of the strings, but I thought it might be a little too busy for a baby quilt, so I decided to just use some of them and then frame them in Toni's beloved orange.

I told Toni that a lot of the fabrics in this quilt came from some of my early sewing projects once I picked up sewing again as a new Momma and some fabric I'd had for some time.  There are fabrics from my bridal shower, Emma's first dance bag, dresses I'd made for her and the orange comes from the crib skirt in Oren's room.  I thought it was fun to share these fabrics from my babies with her baby.


When it came time to quilt, I just went with a meandering loop FMQ which is good in some places and some places need a little work, but we're all friends, right?  So let's just keep a blind eye to those not-so-good places.

I did add a special addition of FMQ Jill's name on the bottom corner.  I'd never done that before and just went with it on a whim.


And then I bound it with some leftover binding strips I had from previous projects in the right colors.  So...it was a WIP that I removed from the list but turned into a greater project by putting it altogether with love.  I hope little Miss Jill gets lots of playtime and love out of it and that Toni feels the love put into it.

This picture made me laugh because Oren looks like he's standing in a jungle!  Actually he's just in my overgrown flower bed...the kids asked me to leave it like that so they could "tunnel" around in there.  And who am I to say no to less gardening chores??  ha

I always say it, but I am so appreciative to have found this online sewing community full of like-minded people.  We  encourage each other to grow and learn in our chosen hobby(ies), but we are also there for each other to encourage each other through life.  Thanks for being a part of my community.  :)

Tuesday, April 5, 2011

My guest blogging post

**Don't forget about the giveaway for earrings from I Heart RocknRoll!  You can find it here.**

  Wasn't Tricia's post yesterday great?  If I didn't already have those earrings from her, I'd enter the giveaway myself!  :) I've tried jewelry making a time or two and already have the supplies, maybe I can make my own now in different colors...


   I thought I'd repost what I wrote for her blog since I made a cute skirt for me, and you know that doesn't happen very often.  So here's a quick tutorial on an easy Anthro-inspired elastic-waist skirt.

  As Tricia's more into the accessory side of fashion and I'm more into the sewing side of it, we thought it would be fun to swap blogs for a day and teach each other's readers something different.  I thought I'd bring y'all a quick and easy tutorial for a simple skirt that won't take long to whip up, but will get lots of compliments.  So let's take a look at our inspiration piece...


   Like many others in blogland, I LOVE how Anthropologie makes life look so sweet and simple and fashionable.  But my wallet DOES NOT.  So, like many others I often bookmark my favorite looks to see if I can recreate them at home for much, much less.  I saw this skirt and liked the look but not the $68 price tag.  $68 for some material sewn together with elastic and some ribbon???  C'mon people!  If you're with me, let's get started.

   I gathered up some supplies: fabric of my choice, 1-inch elastic, ribbon and my usual sewing supplies of machine, matching thread and some pins.  Oh, and you'll need an iron.


    Since this is a tutorial for beginning sewers, I'm changing a few things about the skirt.  We won't be adding the horizontal pintucks (so I used a fabric that had enough visual interest not to miss them.) and I'm leaving out the pockets.  While it looks like the dress has a drawstring waist and the name implies that, it's actually an elastic waist with a decorative ribbon tie.  We'll be doing the same.  Drawstrings aren't hard to do, but elastic is that much easier....

Here we go:
WARNING...BORING MATH COMES FIRST.  Stay with me, I promise it's not as bad as it looks!

1.  To make this skirt fit you, measure your waist.  Mine was 18 inches, so... haha, just kidding.  Mine was about 35 but we're going to go with 36 for ease in math.  We want to multiply this number by 1.5 so our skirt will have some poof to it.  We'll be drawing the waist back in with elastic before we finish.  Since our skirt will have 2 pieces (a front and back) we take our multiplied waist measurement and divide it in two.  But we also have to add an inch to each piece for our seam allowance (or what we'll use when we sew it together.)  So, my width measurement is 28 inches.  If you'd like your skirt to have more "poof" then double the original waist measurement...the poof factor is up to you!
     (36 x 1.5) / 2 + 1 = 28 inches.
2.  Next, you need to measure for length.  I'm making my skirt 19 inches finished length.  This will hit right around the knee.  So, measure from your waist to your desired length.  But, like before, we need to add to that measurement a little.  We'll be folding up the bottom of the skirt to hem it and folding down the top of the skirt for the waistband.  We'll make a 1 inch hem at the bottom, so we'll add 2 inches there and we'll be making a 1 1/2 inch waistband so we'll add 2 inches there.  Stick with me, I promise this is the toughest part!   ;)  My length measurement was 23 inches.
     19 + 2 (for hem) + 2 (for waistband) = 23 inches

3.  Whew, let's all take a break from that awful math and get started on the creating.  On an important sidenote here, you should ALWAYS wash and dry your fabric before making any kind of clothing.  Fabrics shrink at different rates and it would stink if your cute skirt shrunk in the wash to become doll clothes!
      Now, lay out your fabric and measure out your rectangles.  I have my fabric folded in half so I only have to cut once.  I'm using a large ruler and cutting mat with a rotary cutter, but plain old (sharp) scissors work too.  I'm spoiled by my quilting supplies and would never go back to scissors if I didn't have to!  I cut out the two rectangles with our measurements above and I'm ready to start sewing.


4.  Finally, we get to sit down at the sewing machine!  You're going to thread your machine with a matching thread and bobbin and then line up your skirt pieces with the right sides facing each other.  That means, basically your skirt is inside out.  If you are a new sewer, you should pin your edges here together just to be sure.  I never pin, but just for you, I did today.  Well, one side.  I didn't pin the side I didn't take a picture of.  That's how I roll!  Oh, and NEVER sew over pins.  Always stop and pull them out when you get close.  You could sew onto one and break your needle, the machine or yourself if a piece were to fly off.  I'm not a nervous nelly, but this is one safety rule I always follow!

My fabric didn't have a right and wrong side, so it looks like the outside is showing, but really, it's not.  If your fabric has a definite right and wrong side, the wrong side should be up!
   We're going to line up the edge of the fabric on the 5/8 inch line (your machine should have a little line out to the side of the presser foot that says 5/8.  Mine is in cm so it says 15.)  Keep the edge of the fabric aligned with this line and sew a straight seam right down from the top of the fabric to the bottom.  That means, you'll be sewing a straight line along the 23 inch lengths.  It's always a good idea to backstitch at the beginning and end of each seam.  Sew a few stitches, make your machine backstitch a few stitches and then go forward again.  It just locks the seams so you don't come undone!  Once your side seams are sewn, you need to finish the edges.  There are a number of ways to do this, serge, zig zag seams, or the easiest...pinked edges.  Get some pinking shears (those zig zag scissors) and cut along the edges about 1/4 inch from your stitched line.  Pinking the edges will keep them from unraveling!


 5.  Now to the iron...You'll want to iron open your seams so they lay flat when you're wearing them.  Use the heat best suited to your fabric and iron those seam allowances open like the picture.

Then you'll need to work on your hem.  Ironing your hem in place is the best way to ensure an even hem.  Ask me how I know... So, you're going to iron the bottom of your tube of fabric up 1 inch.  I have a metal measuring tool that you can easily pick up anywhere (like Walmart) but I couldn't find it, so I just used my thick plastic ruler.  Measure up 1 inch all the way around to the wrong side or inside and iron that in place.  Now you'll take that 1 inch and fold it up again.  Iron this in place.  This puts your hem on the inside of your skirt and encloses your raw edges so nothing will ravel.  It also looks nice and professional.

 Once this is ironed in place, you may want to pin...I live dangerously and went without it.  Line up the top fold along the inside of your presser foot.  I moved my needle close to the left edge and sewed a straight line all the way around.  This takes practice to stay straight and not sew off the edge.  Go slow if you're unsure and you'll be fine.  (Another sidenote...hems are a great place to use all those decorative stitches on your sewing machine if you're using a plain fabric.)

6.  Now, onto the grommets for the waistband.  If you look at the inspiration photo, the decorative ribbon tie is threaded through grommets.  So, I drove up to Walmart, picked out a set and the hardware needed to install them and went to work.  You could also just put in 2 buttonholes, but the buttonholer is often intimidating to new sewers (who am I kidding, me too sometimes!) so I thought I'd learn something new with you.
     I started by getting the waistband ready.  I did it just like the hem, but first I measured and ironed down a half inch and then measured and ironed down an inch and a half.

Again, this is the inside of the skirt...sorry for the double sided fabric!
Once I got that all ready to sew, I unfolded it all and figured out where to put my grommets.  I measured my skirt.  Right now, it's 27 inches across.  So I marked a spot at 13 1/2 inches as my midpoint right below my waistband fold.  Then I laid down the grommets about an inch away from that and followed the directions on the grommet package including adding a little thick interfacing.  If you don't have interfacing/even know what that is, you could use a scrap of fabric here that you've also cut holes in!
This is the outside of the skirt!
    Once those were hammered in, I folded the waistband back down and got ready to sew it up.  We're almost done now!


  7.  Now that your grommets are attached and your waistband is folded back down to sew, go back to your machine and sew the waistband along the folded edge just like you did the hem, being careful near the grommets not to sew over them.  EXCEPT, you're going to leave a gap of 2-3 inches unsewn.  I usually make this gap near one of the side seams.  Once you've got the waistband sewn, you're ready to add the elastic.


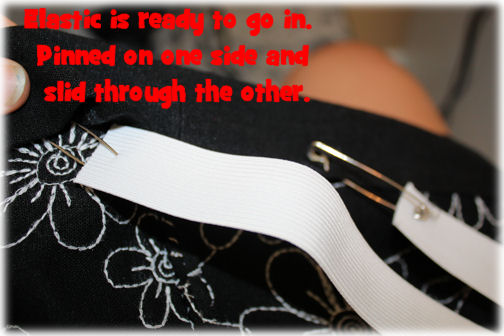
Take your waist measurement from the beginning and cut a piece of 1-inch elastic slightly smaller than that.  You want it to stay put!  Attach safety pins to both ends of your elastic.  Pin one end to the waistband opening and begin to thread the other pin through the channel created by sewing your waistband shut.  You can use the pin in the channel to guide your elastic through and the other pin will keep your loose end from getting lost inside the channel.  When that happens, you have to pull it all out and start over...you don't want to know how many times I've done that.  ;)

   When you get your elastic threaded back to the opening, you'll want to sew it together.  Remove the safety pins, line up your elastic edges and zigzag stitch back and forth over the edges to keep them together.  Once done, slip the elastic into the channel, get it all straightened out and sew up the opening left in your waistband.


8.  Now all we have left to do is thread our ribbon through and try it on!  Use that safety pin again to put your ribbon through one grommet and out the other.  Get it evenly in both holes, trim up the ends (you may want to heat set the ends by holding them near a candle flame.  Get them close enough you can see the ends seal without getting so close you set them on fire.  But, believe me, you can quickly blow the fire out...I have!)  I chose to just cut the ends in a V-shape and call it a day!  And you are ready to show off your new creation!

I know this seems like a lot of steps, but it honestly took me twice as long to write out the directions and take the pictures as it did to make the skirt and I NEVER make up my own patterns.  That's how easy this actually is.  And the best part about this skirt is, once you've mastered it, the doors of garment making are flung open to you.  This is a basic elastic skirt pattern...adapt it with different fabrics, leave out the grommets, make it for any size, lengthen it and run the ribbon through the grommets and make it a halter top.  For that matter, you could lengthen it and add elastic at the bottom too to make a really cute tube top.  Or add elastic to the bottom to make a bubble skirt.  Add side pockets (which I usually do...who doesn't love pockets?) See what I mean?  Once you've got the basics down, you can adapt them in so many ways!


    So, what do you think?  I will definitely be making some more skirts for spring and summer this year, but the next one will have pockets!  And maybe one with a yoga waistband...and a few dresses too.  Oh, and definitely some strapless shirts.  I made a couple last year that turned out really cute.  Hmmm...maybe my next tutorial?  Well, they're so easy, you don't really need a tutorial, but maybe some pics anyway!  Any requests out there?

Thursday, March 24, 2011

Look at my girl and WIP Wednesday (on Thursday)

Wow!  I got an email from Jenny saying she was going to feature Emma in the Swing Top and Pickup Skirt I sewed up last week.  Go...click over and check it out...I'll wait!

  I WAS FEATURED AT:

Okay, so I know this is a small thing in the grand scheme of life, but it really made my day.  And it cemented my belief in blogging.  Like I've said before, I have like 2 friends here in my "real" life that know how to turn on a sewing machine, but to have friends from all over the country and the world that not only know how to do the things I like to do, but are excited about them is a relief and a balm to my creative soul.  Friends often say "Oh, you're so creative, I just could never do that."  But here in bloggy-ville, there are a ton of creative people and I'm just one of many, not the lone ranger.  And I have constant inspiration and encouragement at my fingertips!

Now, back to my WIPs...I'm continuing work on my Mod Mosaic Blocks.  Chris says in Woodworking that people often get project fatigue...well I have it with these blocks.  I still really like them and I know the finished quilt will look great, but I'm just ready to do something different.  Normally, I would have just set them to the side and started something else, but because they've got to be mailed by next week, I felt compelled to finish them before I got sidetracked somewhere else.  I've got 11 1/2 done now and I only committed to 10, so I feel the weight off my shoulders.  I'm going to try to keep going for 20, but......  We had to commit to a multiple of 5 for ease in sorting them.  So if I keep up with them this week, I'll have at least 15 if not 20 to send off.  But I've got some other projects I'm ready to start on.  And they all involve clothing!  I'm ready for skirt and dress season for Emma and maybe even for me.  I bought a new dress pattern yesterday, maybe I'll actually finish something for myself.  Oh, and right before bed last night I decided Emma needed a rolled rosette headband for picture day today, so I whipped that up this morning at 6!  And, boy, do I have the burns from my glue gun to prove it.  I don't know why I always wait to the last minute on stuff like that...oh well.  We were WAY too rushed this morning for even a pic from my phone, so I'll take a picture when she gets home this afternoon.  

So, a day late, (but not a block short!), here are some pictures of my works in progress...
I'm considering using a 2.5 inch sashing of white in between each block.  Pretend my beige-ish carpet is white!  ;)
Here's all the scraps of the scraps.  When that trashcan is full, I'll know it's time to buy more!!  

That ruffle fabric on top is my next project!  And the rest is a pile of clothes from my closet that are about to become new clothes (or cut up for fabric...either way!)