Pages

Showing posts with label tutorial. Show all posts

Wednesday, January 30, 2013

The Road to Fortune

It's my turn to be the "Queen Bee" for That Stash Bee in February so I got myself all organized and ready today.  :)  This bee focuses on traditional blocks made in modern fabrics, but the Queen Bee doesn't send fabric out.  Each participant uses her own fabrics in the specifically-asked for colors.

I asked the girls if they minded doing paper-piecing since some people really do, but I got a resounding "Go for it!" so I did.  After breaking out my Electric Quilt software and designing some really fun quilts I will definitely have to come back to in the future, I decided on the Road to Fortune or Wheel of Fortune Block.

quilt 010
Here's a vintage quilt I found on flickr

This block just drew me in.  There are so many possibilities with this block based on how you lay out the coloring.  But you know me--there wasn't a doubt in my mind what my color choices would be.  Bright and colorful!  I thought about using neon colors--that would have been fun.  But I didn't know how many people had neons in their stash, I don't really.

So, I settled on using these color inspirations:

via this awesome shop


via Design-Seeds


And with all of that bright color running through the quilt, I asked the girls to use white and light gray fabrics for the background.  I thought it would be fun to use some low-volume fabrics though, so I told them solids or low-volume was fine.

Here's my sample block.


The only problem was finding a 12-inch block template for them to use.  I couldn't really, so I made my own.  I printed the templates EQ gave, scanned them and then went over all of the lines to make my own digital file of the templates.  Hopefully it works...


I can't wait to see what the my bee-mates come up with.  I hope they find this block as intriguing as I did.  Now if only I could send out all of the other ideas I've got floating around in my head and have people make them for me...

Here's a mockup of how it might look.  LOVE IT!!!  What traditional blocks do you love that you'd love to make modern?  My list is long...


Sunday, August 21, 2011

One okay skirt to one super cute shirt

This is the blog post I did for Jenny during her Refashion Series.  I thought I'd repost it here, both to have it in my archives and in case anyone didn't click over.  School starts tomorrow for Emma and on Tuesday for Oren...so hopefully I'll get some sewing in this week, but Oren only goes the one day this first week, so my leech may prevent me from getting much done...  ;)  Hope everyone is having a great Sunday!!


When Jenny asked me to be a part of this refashion series, I decided that whatever I made had to come from my closet.  I considered a couple of things, had a craft-fail that will soon be re-refashioned into something else, (that was Emma's lunchbox) and finally settled on this skirt right here.  As you can see in the picture, it's not bad.  It fits fine, it looks fine, it's just not WOW!  But...I'm turning it into a WOW and with minimal changing, so I could always change it back if I wanted to...even better!!


But what to do with it??  I searched refashions online for inspiration and saw this:  

IMG_0690
Found here
And I had my answer.  I didn't even read through the tutorial, although that was just fine because when I looked back, I realized it was a link to another tutorial in French.  ;)

So here's what I did:

1.  Find a skirt at least knee length, the longer the skirt the more options you have for styling.  It needs to have side seams.  This is a cheap, polyester knit from Walmart of all places, so fabric doesn't matter.

2.  Put the skirt on inside out and flip the hem up to your shoulders to see how it will fit as a top.  The skirt's waistband becomes the bubble hem of your new top.  My skirt had a large knit waistband and it's super comfortable, but I imagine a fastened band would be fine if it feels fine to you.  You'll need to adjust the side seams to accomodate your arms, so decide how big you want the "sleeves" to be.
    On my skirt, I went for a sleeveless look, so I just left the hem intact as my shoulder seams and neckline.  then I ripped out the side seams for 8 inches.  Once I made sure I liked that look, I just quickly sewed down the already folded edges to hem up the armholes.  By using the long skirt, it gave the neckline a neat cowl-effect as well.

3.  Now here's the last step:  See how I had a kick pleat in the back of the skirt?  Well, that was a little too low in the back for me...I don't want everyone to see how I fasten my bra, so I just pinned the pleat closed a little higher and sewed along the hemline to hide the stitching.  That way the design element of the open back is still there, but I'm only showing what I'm comfortable with.  ;)


5.  And you're done.  Cute, right?  But here's the best part:  Because my skirt was mid-calf length originally, I have the option of wearing this shirt in different lengths!  I can wear it to bubble at my natural waist, 

at a drop-waist length, like a tunic,


and...as a cute dress!  


In all, it took me A LOT longer to photograph the steps and write up this post than it took to transform this boring skirt into something more fun and hip.  And with my seam ripper and 10 minutes I can always change it back if I need a long, black skirt!  

I encourage you to look around the web, look around your closet and see what you can change.  It's a quick and easy way to brighten your day and your look!

Monday, July 11, 2011

Make it by Monday Challenge


  I love a good challenge, don't you?  It gets you out of your comfort zone, gives a push in a certain direction and holds you to completing something.  Well, Jill at Made it on Monday agrees with me.  She competed in both So You Think You're Crafty and Crafting with the Stars and she missed the weekly challenge format that the contests provided so she's set up a non-competitive version on her site called Make it by Monday (nice play on words, Jill!)
make it by monday

  Our first challenge was "Outdoor Games and Activities."  It's so broad I wasn't sure where I wanted to go with it.  At first I thought of something for the beach (since we're going next week!!!!!!!) and then I thought of something to do right now like an obstacle course or something.  Chris suggested weeding the flower beds and getting the kids to help, but I didn't think that was quite what Jill was going for...

  After some thought I kept going back to tie-dyeing something, I don't know why.  But the thought of tie-dyeing with a 7-yr-old and a 5-yr-old on my back porch made me cringe a little.  Then I remembered an idea I'd saved from Family Fun magazine when Emma was little.  I found it online to make sure I was remembering it right.

  And then, if you can believe it...neither kid had a plain white tee shirt that I could find to get started...so a trip to Walmart later and here we go:

You'll need:
  a tee-shirt for each child (preferably white or light colored)
  cardboard to put in each shirt so the dye doesn't run through
  1 cup flour
  water
  a 4-cup measuring cup
  a squeeze bottle
  Fabric spray paint (I used Tulip Brand)
  a sunny afternoon

Steps:
1.  Prewash your shirts so there'll be no funny shrinkage issues later.  When dry, put the cardboard inside the shirt to make sure your design stays on just the front!  Our cardboard didn't quite fill in all the space and neither the flour mixture or paint made it to the back, so this step is optional, but I would recommend it just in case.
2.  Mix together your flour and just enough water to make a thick liquid (FF said it should look like mustard...) and then pour it into your squeeze bottle.
3.  Squeeze your design onto the front of your shirt.  FF used a sunburst idea, but my kids went with a peace sign and a monster truck.  (I have to admit that the part of me that is a control-freak that usually stays hidden came out and I drew on the design as the kids told me what they wanted.)

4.  Leave the shirt in the sun to dry for a couple of hours.  So,  there was absolutely no sun when we did this because of the tropical wave that has been hanging over us, so we did this part indoors and I used the blow-dryer...


5.  When the flour paste mixture has dried and hardened on the shirt, begin spraying on the color.  We did this one kid at a time, one color at a time, and laid down LOTS of newspaper first.  (I will also admit that we did this before the flour paste was all the way dry and in retrospect, that was the best choice!!)


7.  Leave the shirt to dry again.  This time we left them on the back porch so the heat would dry them but I got impatient and used the blow-dryer again.  I mean, really...who has 4 hours to wait when there's a blog post to be written???


 8.  When the paint is fully dry, pick the flour mixture off to show off the white underneath.  This was harder than you might think where the flour had fully hardened.  The softer parts were doughy and messy, but much easier to peel off.  And yes, Chris and I did most of the peeling.  It was a family affair!


9.  Launder as your fabric paint recommends and wear with pride!!  And we obviously haven't laundered yet, but I let them wear them for the picture.  The paint actually says to let it set for 72 hours before laundering.  


  So these shirts aren't the most fashionable thing around, but the kids thought this was SOOOO fun.  Since I bought a set of 6 shirts, I told them we could make more at the beach next week using the sun to dry them instead of Momma's hair dryer.  Oren's already decided his will have a shark on it...

  In all, this was a fun and easy project.  The kids had some trouble with the spray bottles, their little hands weren't quite strong enough, but they thought it was great fun.  I think I'd like to make one using a stencil of some kind...I may be using my silhouette to cut something to take to the beach with me too!!  :)

  Thanks for the fun challenge, Jill.  I might not have got around to doing this otherwise and it was really a great time.

Tuesday, April 19, 2011

A Summery Top for me!

Hi everyone!  I’m back today with a quick post about the strapless shirt I made on Saturday.  I didn’t take pictures along the way because it really is that simple, but I’ll tell you what I did. 

Does anyone else scrunch up their face every time they use their camera?  Oh, it's just me...well, then.


I bought this simple knit t-shirt at Walmart from one of their $3 displays. I liked the color and the fit was good, so I didn’t want to change it too much.  But I thought a strapless look might be cute.  I laid the shirt down on my cutting board and lined the ruler up with the bottom of the sleeves.  Since my shirt was striped, this was even easier.  I had a built in level!  I just cut straight across, cutting off the sleeves and neckline/shoulders.

Then I just folded over about an inch (again, I just used the stripes as a measurement) and pressed it.  I had half-inch elastic handy, but you can just fold down a little more than the size of whatever size elastic works for you.  I stitched this down, leaving a hole to thread the elastic through.  (Because this was just for me and knits don’t ravel, I didn’t even worry about folding up the raw edge.)  Here’s where I forgot I was working with knits and used a straight stitch.  Be sure to use a stretch stitch on your machine so you don’t pull the stitches out like mine did in a few places.  Oh, and switch to a ballpoint needle, they work much better for knits.  I did at least remember to switch needles.  If you’ve never worked with knit fabrics and that made no sense, let me know or just google sewing with knits!  ;)

Now, measure your chest around and cut the elastic just a little smaller than that.  This is one place we want to make sure the fit is good and tight…especially because we’ll be wearing it during the hot and sweaty summer months.  Don’t want this baby slipping and sliding off, do we??

Once I had the elastic cut, I pulled it through, sewed it up and sewed up my casing.  Then with the extra pieces, I cut strips and gathered them to make little flowers and hand-sewed them on the “neckline.”  I thought it made for a simple, quick, but cute little top.  And it’s versatile too.  Depending on the amount of scrap fabric you cut off in the beginning, you can make little halter ties and tack them down to the inside front.  Or, buy a shirt in a bigger size than you need and cut a small hole in the hem and use it as a casing for elastic or a drawstring for a blousy look.  You could put an embroidery or appliqué design on it.  Or go crazy with flowers or ruffles along the top or side. 


I’ll be linking up again to some great parties.  Check out the list here, and make sure to go see all the great goodies these ladies have for ya.  Summer clothing should be simple and fuss-free.  Don’t you think?  What do you love to wear all summer long?

Tuesday, April 5, 2011

My guest blogging post

**Don't forget about the giveaway for earrings from I Heart RocknRoll!  You can find it here.**

  Wasn't Tricia's post yesterday great?  If I didn't already have those earrings from her, I'd enter the giveaway myself!  :) I've tried jewelry making a time or two and already have the supplies, maybe I can make my own now in different colors...


   I thought I'd repost what I wrote for her blog since I made a cute skirt for me, and you know that doesn't happen very often.  So here's a quick tutorial on an easy Anthro-inspired elastic-waist skirt.

  As Tricia's more into the accessory side of fashion and I'm more into the sewing side of it, we thought it would be fun to swap blogs for a day and teach each other's readers something different.  I thought I'd bring y'all a quick and easy tutorial for a simple skirt that won't take long to whip up, but will get lots of compliments.  So let's take a look at our inspiration piece...


   Like many others in blogland, I LOVE how Anthropologie makes life look so sweet and simple and fashionable.  But my wallet DOES NOT.  So, like many others I often bookmark my favorite looks to see if I can recreate them at home for much, much less.  I saw this skirt and liked the look but not the $68 price tag.  $68 for some material sewn together with elastic and some ribbon???  C'mon people!  If you're with me, let's get started.

   I gathered up some supplies: fabric of my choice, 1-inch elastic, ribbon and my usual sewing supplies of machine, matching thread and some pins.  Oh, and you'll need an iron.


    Since this is a tutorial for beginning sewers, I'm changing a few things about the skirt.  We won't be adding the horizontal pintucks (so I used a fabric that had enough visual interest not to miss them.) and I'm leaving out the pockets.  While it looks like the dress has a drawstring waist and the name implies that, it's actually an elastic waist with a decorative ribbon tie.  We'll be doing the same.  Drawstrings aren't hard to do, but elastic is that much easier....

Here we go:
WARNING...BORING MATH COMES FIRST.  Stay with me, I promise it's not as bad as it looks!

1.  To make this skirt fit you, measure your waist.  Mine was 18 inches, so... haha, just kidding.  Mine was about 35 but we're going to go with 36 for ease in math.  We want to multiply this number by 1.5 so our skirt will have some poof to it.  We'll be drawing the waist back in with elastic before we finish.  Since our skirt will have 2 pieces (a front and back) we take our multiplied waist measurement and divide it in two.  But we also have to add an inch to each piece for our seam allowance (or what we'll use when we sew it together.)  So, my width measurement is 28 inches.  If you'd like your skirt to have more "poof" then double the original waist measurement...the poof factor is up to you!
     (36 x 1.5) / 2 + 1 = 28 inches.
2.  Next, you need to measure for length.  I'm making my skirt 19 inches finished length.  This will hit right around the knee.  So, measure from your waist to your desired length.  But, like before, we need to add to that measurement a little.  We'll be folding up the bottom of the skirt to hem it and folding down the top of the skirt for the waistband.  We'll make a 1 inch hem at the bottom, so we'll add 2 inches there and we'll be making a 1 1/2 inch waistband so we'll add 2 inches there.  Stick with me, I promise this is the toughest part!   ;)  My length measurement was 23 inches.
     19 + 2 (for hem) + 2 (for waistband) = 23 inches

3.  Whew, let's all take a break from that awful math and get started on the creating.  On an important sidenote here, you should ALWAYS wash and dry your fabric before making any kind of clothing.  Fabrics shrink at different rates and it would stink if your cute skirt shrunk in the wash to become doll clothes!
      Now, lay out your fabric and measure out your rectangles.  I have my fabric folded in half so I only have to cut once.  I'm using a large ruler and cutting mat with a rotary cutter, but plain old (sharp) scissors work too.  I'm spoiled by my quilting supplies and would never go back to scissors if I didn't have to!  I cut out the two rectangles with our measurements above and I'm ready to start sewing.


4.  Finally, we get to sit down at the sewing machine!  You're going to thread your machine with a matching thread and bobbin and then line up your skirt pieces with the right sides facing each other.  That means, basically your skirt is inside out.  If you are a new sewer, you should pin your edges here together just to be sure.  I never pin, but just for you, I did today.  Well, one side.  I didn't pin the side I didn't take a picture of.  That's how I roll!  Oh, and NEVER sew over pins.  Always stop and pull them out when you get close.  You could sew onto one and break your needle, the machine or yourself if a piece were to fly off.  I'm not a nervous nelly, but this is one safety rule I always follow!

My fabric didn't have a right and wrong side, so it looks like the outside is showing, but really, it's not.  If your fabric has a definite right and wrong side, the wrong side should be up!
   We're going to line up the edge of the fabric on the 5/8 inch line (your machine should have a little line out to the side of the presser foot that says 5/8.  Mine is in cm so it says 15.)  Keep the edge of the fabric aligned with this line and sew a straight seam right down from the top of the fabric to the bottom.  That means, you'll be sewing a straight line along the 23 inch lengths.  It's always a good idea to backstitch at the beginning and end of each seam.  Sew a few stitches, make your machine backstitch a few stitches and then go forward again.  It just locks the seams so you don't come undone!  Once your side seams are sewn, you need to finish the edges.  There are a number of ways to do this, serge, zig zag seams, or the easiest...pinked edges.  Get some pinking shears (those zig zag scissors) and cut along the edges about 1/4 inch from your stitched line.  Pinking the edges will keep them from unraveling!


 5.  Now to the iron...You'll want to iron open your seams so they lay flat when you're wearing them.  Use the heat best suited to your fabric and iron those seam allowances open like the picture.

Then you'll need to work on your hem.  Ironing your hem in place is the best way to ensure an even hem.  Ask me how I know... So, you're going to iron the bottom of your tube of fabric up 1 inch.  I have a metal measuring tool that you can easily pick up anywhere (like Walmart) but I couldn't find it, so I just used my thick plastic ruler.  Measure up 1 inch all the way around to the wrong side or inside and iron that in place.  Now you'll take that 1 inch and fold it up again.  Iron this in place.  This puts your hem on the inside of your skirt and encloses your raw edges so nothing will ravel.  It also looks nice and professional.

 Once this is ironed in place, you may want to pin...I live dangerously and went without it.  Line up the top fold along the inside of your presser foot.  I moved my needle close to the left edge and sewed a straight line all the way around.  This takes practice to stay straight and not sew off the edge.  Go slow if you're unsure and you'll be fine.  (Another sidenote...hems are a great place to use all those decorative stitches on your sewing machine if you're using a plain fabric.)

6.  Now, onto the grommets for the waistband.  If you look at the inspiration photo, the decorative ribbon tie is threaded through grommets.  So, I drove up to Walmart, picked out a set and the hardware needed to install them and went to work.  You could also just put in 2 buttonholes, but the buttonholer is often intimidating to new sewers (who am I kidding, me too sometimes!) so I thought I'd learn something new with you.
     I started by getting the waistband ready.  I did it just like the hem, but first I measured and ironed down a half inch and then measured and ironed down an inch and a half.

Again, this is the inside of the skirt...sorry for the double sided fabric!
Once I got that all ready to sew, I unfolded it all and figured out where to put my grommets.  I measured my skirt.  Right now, it's 27 inches across.  So I marked a spot at 13 1/2 inches as my midpoint right below my waistband fold.  Then I laid down the grommets about an inch away from that and followed the directions on the grommet package including adding a little thick interfacing.  If you don't have interfacing/even know what that is, you could use a scrap of fabric here that you've also cut holes in!
This is the outside of the skirt!
    Once those were hammered in, I folded the waistband back down and got ready to sew it up.  We're almost done now!


  7.  Now that your grommets are attached and your waistband is folded back down to sew, go back to your machine and sew the waistband along the folded edge just like you did the hem, being careful near the grommets not to sew over them.  EXCEPT, you're going to leave a gap of 2-3 inches unsewn.  I usually make this gap near one of the side seams.  Once you've got the waistband sewn, you're ready to add the elastic.


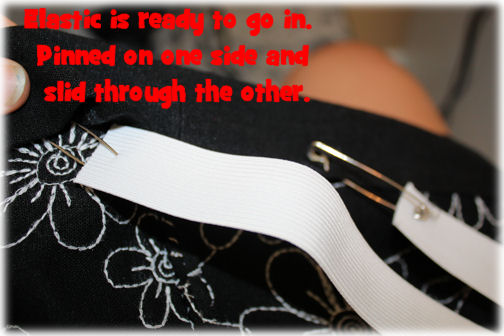
Take your waist measurement from the beginning and cut a piece of 1-inch elastic slightly smaller than that.  You want it to stay put!  Attach safety pins to both ends of your elastic.  Pin one end to the waistband opening and begin to thread the other pin through the channel created by sewing your waistband shut.  You can use the pin in the channel to guide your elastic through and the other pin will keep your loose end from getting lost inside the channel.  When that happens, you have to pull it all out and start over...you don't want to know how many times I've done that.  ;)

   When you get your elastic threaded back to the opening, you'll want to sew it together.  Remove the safety pins, line up your elastic edges and zigzag stitch back and forth over the edges to keep them together.  Once done, slip the elastic into the channel, get it all straightened out and sew up the opening left in your waistband.


8.  Now all we have left to do is thread our ribbon through and try it on!  Use that safety pin again to put your ribbon through one grommet and out the other.  Get it evenly in both holes, trim up the ends (you may want to heat set the ends by holding them near a candle flame.  Get them close enough you can see the ends seal without getting so close you set them on fire.  But, believe me, you can quickly blow the fire out...I have!)  I chose to just cut the ends in a V-shape and call it a day!  And you are ready to show off your new creation!

I know this seems like a lot of steps, but it honestly took me twice as long to write out the directions and take the pictures as it did to make the skirt and I NEVER make up my own patterns.  That's how easy this actually is.  And the best part about this skirt is, once you've mastered it, the doors of garment making are flung open to you.  This is a basic elastic skirt pattern...adapt it with different fabrics, leave out the grommets, make it for any size, lengthen it and run the ribbon through the grommets and make it a halter top.  For that matter, you could lengthen it and add elastic at the bottom too to make a really cute tube top.  Or add elastic to the bottom to make a bubble skirt.  Add side pockets (which I usually do...who doesn't love pockets?) See what I mean?  Once you've got the basics down, you can adapt them in so many ways!


    So, what do you think?  I will definitely be making some more skirts for spring and summer this year, but the next one will have pockets!  And maybe one with a yoga waistband...and a few dresses too.  Oh, and definitely some strapless shirts.  I made a couple last year that turned out really cute.  Hmmm...maybe my next tutorial?  Well, they're so easy, you don't really need a tutorial, but maybe some pics anyway!  Any requests out there?