Pages

Monday, February 28, 2011

A 10 minute project takes all week

Sorry for the non-posting last week.  Have you ever started an "easy" project so you'll have something accomplished only to find it gets more and more time consuming?  Well, between Oren's stomach issues (we're more than 2 weeks since the first diarrhea/vomiting issue--yes, we went to the Dr. today), and my sunburn, I decided I'd take a shirt/dress I'd bought for Emma weeks ago and refashion it.  "It'll only take an afternoon," I thought, and then hopefully we'll all feel better.  Well, that afternoon project got finished up last night.  See, it started out as this shirt...  Well, actually not this shirt.  Since I bought mine on clearance I can't find a picture of it online and I didn't take one.  So imagine this shirt but in a dark wash denim color, pin tuck detailing all along the front bodice and with a more "slanty" neckline before the buttons start.  But this was the closest I could find online.  C'mon, you can totally imagine this shirt as a completely different shirt, right?  Same basic style!

I bought an adult small when I saw it on clearance at Walmart thinking I could take it in a little and it'd be great for Emma to layer with leggings for the winter/early spring.  Haha, like we have "early spring" around here.  It's winter till it's spring, oh wait, I mean summer!  But, it didn't fit just right and she wasn't a big fan so we put it aside till I could figure out what to do with it.

This is from The Children's Place, but when I went to link up, I couldn't find it again.  SORRY TCP!!
Then I saw this... and I had inspiration!  Okay, it would be a little different as my shirt buttoned all the way down and she wanted to keep the dress length instead of shortening it into a tunic.  But I threw myself into this Tuesday afternoon.  First I cut off the 3/4 length sleeves and transformed them into fluttery cap sleeves.  Then I took in the sides to make it fit her better.  I ruffled my extra sleeve material cut into strips for the raw-edge flowers.  I pinned one on and let her try it on...

She thought it was okay, Chris didn't like it and I wasn't sure.  He thought the sleeves were too poofy.  She only wanted to add one flower.  And me...I didn't like how my skinny 6 year old was wearing a shirt with a neckline cut down to her rib cage!  So we looked at it and decided that maybe it would be cuter as a skirt.  (May I mention here that if I'd made a skirt from the beginning, I'd have been done10 minutes after I sat down with it...)
  

Then I let her go to bed without measuring her waist, so I did that yesterday and quickly attached the elastic by zigzagging it to the top and folding over instead of a casing.  I really just wanted to be done!  So, here's a few picture of my sweet model wearing the tunic dress skirt this afternoon after school.  I'm still not sure about it, but it is done.  Check that one off.  And who wouldn't love taking pictures with this sweet model.  The pictures and playing with the color were way better than the project anyway!  ;)

Goodness, I love this kid!  I am one lucky Mama to have such precious children!

Monday, February 21, 2011

A Public Service Announcement (oh, and some hairbows too)

Well, I'm not doing my usual Monday Munchies today because I have a public service announcement for you instead....
  Just because the weather is beautiful, and you are so glad to be living in Florida where the temperatures reach 80 in February and other parts of the country are still being hit with snow, don't forget your sunscreen in February.  Going to a birthday party at the park during the peak hours of sun (11-2) is not a time to bask in the forgotten rays.  And forgetting your SPF face lotion before you get ready is really not smart.  Nor is continuing to sit in the sun for 15 more minutes when you feel the insides of your arms beginning to burn.  Is everyone with me that sunscreen and avoiding sun exposure is important?  Does everyone understand that I'm saving you a very hard lesson that I (re)learned this weekend?  Oh, you want proof that I'm a dummy?  Well, just because I'm trying to save you from some heart (and severe skin) ache, here you go...

  Yes, this is me with absolutely no makeup and no editing.  Now that is some raccoon eyes if I ever saw some!  My little camera man saw my camera sitting by the computer and said "Mama, can I take your picture?"  I laughed and said "I look awful, remember, my face is all burned."  He said, "No, really, Mama, you look just perfect."  How could I say no to that.  And by the way...this picture doesn't even do my burn justice.  It's much more red than this and this doesn't even show my purple shoulders or shins!!  Chris is sure I'm going to peel all over and I think he's probably right...the only good thing about peeling would be I can start over and not spend the spring and summer with these ridiculous tan lines on my face!

  But since I couldn't go outside and enjoy this lovely weather this long weekend, I decided to whip up some more headbands.  But then I decided to just make the bow part and let the recipient decide if they want it attached to a headband or clip.  I started off with a version similar to what I made Saturday for the party only I used fabric instead of felt, so I pinked the edges.  After a few of these,  I moved on to some free style attempts with tulle and an old present topper that I'd saved to make into a hair bow one day.  After I took this picture, I even made a braided headband ala Kristin but I went for a double strand.  This one's got to stay around here because my ends need a little work, but I'll post pictures soon.  I don't think I'm quite done with hair bows and headbands just yet.  I've got a lot more inspiration to work through...


Stay warm if you've still got snow.  Stay outdoors if the weather is beautiful...but please, wear sunscreen!!  Take it from me!

Saturday, February 19, 2011

Gifts to give

Well, I finished up the bed caddy yesterday.  They're going to attach it to his bed with velcro strips, so while most bed caddies have a large area that goes under the mattress, mine doesn't.  I glued velcro strips to the back on top and bottom to hold it up.  I really debated the strength of using glue over sewing in the strips, but I ultimately decided that stitching the strips would take away from the front and I would have had to attach them before I put any of the pockets on.  And since it was too late for that...Fabritac it was!  I ended up making 2 big pockets, one for his bible and one can be for a notebook, hidden snack, whatever.  I also added a small pocket for a pencil or pen for said notebook and the top pocket is for his glasses.  I don't know if he'll use that, but I thought it might be a good idea for a 9 year old boy to have a safe place for them. I made little pleats in the bottom of the two big pockets so they'd have more holding capacity but still be tight to the caddy.  I hope it's what my friend was wanting and it gets much use.  And I even have some leftover FSU fabric I can quickly make into hairbows or something to get rid of it...  :)
It is not attached with the velcro here but just sitting on a bench.
 Emma and I had a birthday party to go to this morning, so we decided to make her a little headband as part of the gift.  The kids have been suffering from a lingering stomach bug this week and I haven't had a chance to go shopping, even for groceries, all week.  I think more than anything their little bodies can't fully fight it off because they're exhausted.  We started teeball practice this week and it's an hour or so on Tuesday and Thursday afternoons.  They were so excited and a little nervous about it I think it just wore them out.  Luckily they've got the best coach and team Mom ever!  Haha (The head coach is Chris if you didn't know...)

And back from that tangent to the headband.  We looked up headbands on etsy and tutorials around the web, and Emma decided she liked Jessica's version the best (found here) for her friend.  So, working with felt and headbands we had on hand, this is what I came up with.
This is so perfectly easy and quick!  Great for last minute gift ideas!!
I left off the leaves.  Emma loved it so much I quickly made her a matching one.  Only Emma's is on a blonde colored headband and has pink and purple buttons in the center instead of black.  We also sprayed some temporary hair glitter on hers for some added sparkle.  I didn't get a picture of her wearing it, but maybe I'll make an outfit to match and show it off then.

So that's what I've been up to...  Next up is a trip to JoAnn for some Kona White because I joined a swap and can't wait to get started on my blocks!!!

Here's hoping you have a great long weekend (assuming you have President's Day on Monday, or for my hometown--Rodeo Day yesterday).  The weather is warm and we're going to spend it outside!

Wednesday, February 16, 2011

I can't believe I'm using this fabric...

A good friend of mine (who has very opposing taste in sports teams) asked me if I could make a bed caddy for her son for his upcoming birthday.  She laughed when she asked if using Seminole (Florida State University) fabric in my machine would cause it to blow up.  Chris and I are both graduates of the University of Florida (Go Gators!) and Florida State is one of our biggest rivals.  I told her I thought it would be fine this one time.  My brother went to Florida State and one year for Christmas I made him a raw-edge square in a square quilt using only garnet, gold and white fabrics in the quilt.  I told him I loved him and wanted him to have this special quilt in his school colors, but if he looked closely I never actually used FSU fabrics.


So, I broke down and bought some of the licensed fabric from JoAnn and am all set to get this bed caddy sewn up.  My friend said her son has bunk beds, but sleeps in the top bunk.  So, she wants a place where he can keep his bible and other things.  I did some research online and looked up other's ideas of a perfect bed caddy and I think I'm ready to start cutting.

Only problem is the kids have early release from school today, meaning I've got to pick them up at 11:45 and Oren's having his birthday pictures taken this afternoon at 4:30.  My big boy turns 5 in 2 weeks and this was the only day before that my photographer friend and I could get together.  So I may not get to cutting today, but I hope to have it done by the end of the week.  I'll post pictures when I get something accomplished with it!  ;)

Do you ever have a project you just want to get started on so you can get it done, but for some reason, it's just hard to get it going?

Monday, February 14, 2011

Monday Munchies with Popcorn

HAPPY VALENTINES DAY!!

I wanted to make something for Valentines Day last night that was a little different.  No offense meant to cute cookies, cupcakes and other traditional goodies because I'm a traditional girl, but after 2 parties last week, I just wanted something a little different.


 Sunday night around here is usually popcorn night.  I make a big batch on the stove top (it's really so easy and tastes so much better than microwave popcorn) and we throw it in to two bowls and share together.  So yesterday I thought..."Why not make a flavored popcorn!"  I looked up recipes online and decided to go with the cinnamon sugar popcorn.  It looked like it was not quite as sweet as caramel corn but definitely more than just regular old popcorn.  I actually really like to add seasonings to my popcorn--taco seasoning, cajun seasoning, etc., but I'm the only one at our house, so I have to fix myself a small bowl because no one will share with me.  I started with this recipe, but changed it a little bit.  I actually put all of the sugar and spices in with the butter and melted them down together (oops...might should read the recipe a little closer).  But it came out just fine.  I also added pecan halves to the bowl of popcorn before pouring on the glaze.  And then, after baking it and letting it cool a little, I melted chocolate chips down and drizzled that over the top of the pans and let it cool for an hour or so before packing it all in air-tight containers for the night.


I thought we'd take some to the kids' teachers.  We'd bought them valentine chocolates for them already, but this was a special treat and I really didn't want it all here in the house with me.  I've got the willpower of a one-celled organism (or something else with absolutely no willpower!).  But then Emma came down with the stomach flu in the night, so I have all of this beautiful bagged popcorn just sitting here and laughing at me.  Luckily for me...once it's bagged up so pretty, I have no interest in opening it up.  It's like I know it's actually someone else's, so I don't want it.  I should bag up everything in the house that way!


I think it looks so pretty, like one of those expensive gourmet mixes you can buy.  Who knew it was so easy??  I will admit I ate more than my fair share last night.  I may or may not have given myself a stomach ache.  I'm just saying....  But I will add that if I were to make this again, I'd definitely double the cinnamon sugar mixture so that all of the popcorn had a little more of the goodie on it.

Cinnamon Sugar Popcorn
  Based on MACCO's recipe from allrecipes.com  My changes and additions are in pink.


Ingredients
1 cup unpopped popcorn
  • 1/3 cup butter
  • 2/3 cup white sugar
  • 2 teaspoons ground cinnamon
  • 1/2 teaspoon salt
  • 1/2 teaspoon vanilla extract
  • ( I added a handful of pecan halves and maybe 1/2 to 3/4 cup of semi-sweet chocolate chips.  Sorry, I didn't measure.)

  • Directions
  1. Preheat an oven to 250 degrees F (120 degrees C). Pop the popcorn using an air popper according to manufacturer's directions. Place into a large mixing bowl, and set aside.  I added the pecan halves to the bowl of popcorn.
  2. Melt the butter in a small saucepan over medium heat. Stir in the sugar, cinnamon, salt, and vanilla, and cook until thick and bubbly. (This is when I misread the recipe and poured it all in the pan together and melted it down. Worked fine for me.)  Pour over the popcorn, and stir until the popcorn is evenly coated. Spread the popcorn into a large roasting pan.  (I actually spread it onto 2 parchment paper-lined cookie sheets.)
  3. Bake in the preheated oven 10 minutes, then turn the heat off, and allow the popcorn to stay in the oven 20 minutes longer. Remove from oven, and cool completely before serving.
  4. When it had cooled some, I melted a BIG handful of chocolate chips in the microwave and then drizzled it over the popcorn on the cookie sheets.  When the chocolate had cooled and hardened, I stored the mixture in air-tight containers.

If you make some of this, let me know.  And if you've got any recipes you'd like to share, then share!  I'm always up for new recipes!

Friday, February 11, 2011

Feeling very blessed

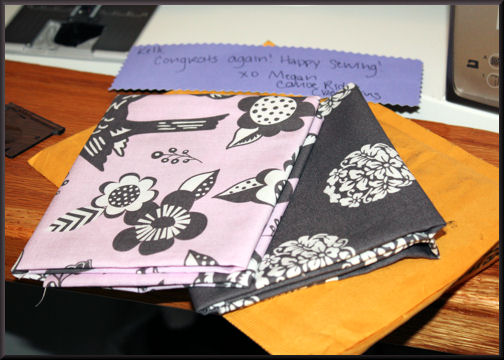
Hey y'all and happy Friday!!  I just wanted to pop in to say Hi and share my blessings today.  I found out last week that I'd won a fat quarter giveaway from Megan and the fabrics came night before last!  They are so pretty and I've got them between my computer and sewing machine waiting for inspiration to strike on what to do with them...  THANK YOU, MEGAN!!


Today I got to spend most of the day at school celebrating love and friendship with my two favorite kiddos.  Oren's Valentine's Day party was this morning and Emma's was this afternoon.  She LOVED the dress when she got home from school yesterday and wore it around the house last night and then was thrilled to wear it again today.  So, I'm not sure if we're making progress in that arena or if she is just super excited about Valentine's Day.  Either way...I'll take it.  And Oren decided that he didn't need a special shirt, so that solved that problem for me.


Then this afternoon, she rode home from school on the bus (first time ever) with a friend to spend the night.  It's her first one-on one sleepover (she's stayed over at a big birthday party with this same friend)!  But before they get to sleeping, we're having a Valentine's party over there tonight with friends from church.  So, at least I'll get to kiss her goodnight and make sure she's got everything she needs.  I always tell Chris that my kids don't suffer from separation anxiety, but I do.  I rationalize it by saying that because I'm a stay-at-home Mom, my job is to care for them and be with them.  So when we're apart for any length of time, I get nervous because my "job" is gone.  I think it's just because I'm a wierdo, but the other explanation sounds so much better.
I know the blur looks wierd, but I only got a few action shots today and in an effort not to give away too much info on where we live, I tried to blur out their classrooms.

So...in a nutshell, I am feeling very blessed today and want to share the love.  Happy Friday, Happy weekend, and Happy early Valentine's Day to all of you.  May you feel the love of God each day in the blessings that surround you.

Thursday, February 10, 2011

A sweet dress for my sweetheart


Back in the fall, I vowed that I was done making Emma any more clothing for awhile.  It's not like it's hard, really, but it does take time and money.  And when I get something done and she doesn't like it or refuses to wear it more than once, it's kinda a let-down, you know.   Emma has very defined views of what she likes and doesn't.  And while they're clearly defined to her, it may not be so obvious to the rest of us.  I might pick something out I just know she'll love, and then she doesn't.  So, I decided that my efforts were better spent in quilting or other projects that didn't require her to love it in order for me to feel satisfaction in the end result.  

Then I saw this fabric...
Oh my goodness, I am done fighting blogger...pretend this is facing the right way please.  This picture will not load correctly!!!!
And I knew it had to become a Valentine's outfit.  She happened to be with me at JoAnn (which she HATES to do), so I showed it to her to make sure she liked it to.  She said yes, so we bought 2 yards.  A week or so later, I showed her my dress and skirt patterns and let her choose the dress design too.  I'm trying here...  And luckily she picked a super-easy jumper (Simplicity 2432) that I've made before and knew would go quickly.  
 

 So Tuesday morning, I cut it all out and got it sewn up to the zipper (which is the last step) because I didn't have one.  It went quickly and the only place I had to slow down was adding side pockets.  The pattern doesn't call for them, but who doesn't love having pockets?  So, I added them using this tutorial here.  Unfortunately, I decided I could remember how to do it alone...after a visit with my seam ripper, I used the tutorial and had side pockets installed.

Now this morning, my brain must be foggy because it took me like half an hour to get the zipper installed and if you look at the pictures you'll notice that I somehow managed to get one side of the back higher than the other when installing the darn zipper.  I mean, really...  But I decided not to rip it all because her hair will be down most likely, and because I'd decided to make the bolero jacket that came with the pattern. Emma picked out a Kona cotton called Bubblegum for the bolero yesterday.  I used a darker pink for the lining and pockets (you can see it in the photos--that's the dress lining, not the bolero lining).  And the bolero with it's 3 steps took me the rest of the morning.  I don't know why I couldn't wrap my head around it, but man, it was way harder than the dress.  At any rate, I've got the dress and bolero ready for her to wear to her Valentine's party tomorrow at school (if she so chooses).  And I'm happy with them.  Other than that darn zipper.
Notice a hint of blue skies (yeah, it rained here this morning AGAIN!) and the dump truck in the yard.  Nice!
I'm contemplating making something for Oren.  I don't know.  Emma can wear this dress for months and it'll still be cute, but a valentine's shirt for a boy seems wrong after February 14th, no?  If I do..I'll post it along with pictures of Em in the dress.

Monday, February 7, 2011

Monday Munchies with Muffins

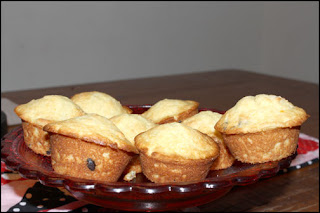
We have been in a fog of rain and cloudy skies for about a week.  Don't get me wrong, I'm not complaining.  Compared to what much of the country got, we're downright lucky.  But, it does make for some gloomy days when everywhere you look is gray and the chance for recess during the school day is slim to none for a week.  So last Thursday I thought I'd start the day off on a cheery note with some fresh-baked muffins.  As for flavor...well, I'd spoiled the kids with a treat of dark chocolate with an orange filling the week before, so I thought I'd use that as my inspiration.  I've got a recipe for orange-chocolate muffins, so I found it and rolled with it.
This was all that was left after breakfast...they ate 2 each!  Sorry for the lighting.  No natural sunlight will do that to you.
   These were absolutely delicious and a great way to wake up in the morning.  The orange flavor is refreshing and bright and the chocolate really makes it feel like a special treat.  The recipe called for squares of chocolate to be shaved, but it was a school morning, so I used dark chocolate chips.  As a former teacher, I HATE being late for school and we're still sometimes rolling in on two wheels to beat the tardy bell, so I wasn't even going to attempt to shave chocolate in the morning!  ;)


This recipe is from the Taste of Home Celebrations Cookbook.  My Mom bought it for me a few years ago for Christmas to feed my baking habit.  It's got lots great recipes for holidays and seasons throughout the year.  These muffins were under the Home-Baked Holiday Breads section, but I thought they were a great everyday treat.  Directions follow from their web site; my changes or additions are in orange.


  Orange Chocolate Muffins

Ingredients

  • 1/2 cup butter, softened
  • 1 cup sugar
  • 2 eggs
  • 1/2 cup sour cream (I substituted vanilla flavored all-natural yogurt)
  • 1/2 cup orange juice
  • 2 to 3 tablespoons grated orange peel
  • 2 cups all-purpose flour
  • 1 teaspoon baking powder
  • 1/2 teaspoon baking soda
  • 3 ounces bittersweet chocolate, grated  (I used roughly 3 ounces of dark chocolate chips but didn't really worry about measuring precisely...how bad is a little extra chocolate??)

Directions

  • In a small bowl, cream butter and sugar until light and fluffy. Add eggs, one at a time, beating well after each addition. Beat in the sour cream/yogurt, orange juice and peel. Combine the flour, baking powder, baking soda and grated chocolate; stir into creamed mixture just until moistened. Fill paper-lined muffin cups (as you can see, I just sprayed Baker's Joy all over my pan) three-fourths full.  (I use an ice cream scoop to get a fairly even amount in each cup and eyeball it...it's breakfast for my kiddos, no perfection required.)
  • Bake at 400° for 15-20 minutes or until a toothpick comes out clean. Cool for 5 minutes before removing from pans to wire racks. Yield: about 1-1/2 dozen.  (Mine made 12...maybe Oren and I sample too much along the way....)
Let me know if you try these out.  Or if you've got any good recipes to try.  We're always looking for yummy treats to sample!

Friday, February 4, 2011

Sent with Love

So, I actually wrote this post yesterday, but Blogger and I got into a fight, and guess what...Blogger won!  So, this post is a day late and possibly a dollar short...but I'll leave that up to you to decide...

Woohoo!!  I got my postage stamp quilt pieced!  Well, I'm still deciding on borders, but I got the top pieced!!  Everyone that participated said how easy it was and how quickly it went together.  Deciding to use scraps really cut into that quick part.  Measuring out different lengths of scraps and cutting them at a 2 1/2 inch width and then piecing all of those different lengths took awhile.  The only yardage I used was a little white cotton sateen I had left over from an Easter dress a few years back.  Everything in this quilt is a scrap that came from my previous sewing projects or from my great-grandmother who passed away in 2004.  Many of her scraps were given to me as I'm the only family member who sews much.  And I can tell you where each piece of fabric is from, either what I made with it, or that it's from her.  But I will say, that even with the extra cutting and measuring the scraps instead of using jelly roll strips, this pattern was super easy.  The hardest part was keeping track of how many pieces I'd made and how many I still needed!
Excuse the lighting.  There's no sun in sight and I had to make do with my bedroom floor...


  I'm thinking of labeling this one as Sent with Love since it's a postage stamp quilt and the fabrics are all from things my "Mamo" and I made with love.  I haven't decided.  If you have a better suggestion, let me know.  It'll probably come to me right before I fall asleep one night...that's how it usually goes for me.  I am happy with this one.  There are definitely seams that don't line up and a few places where I got off a quarter inch, but I'm not bothered.  I'm hoping some dense free-motion will fill some of that in anyway.  I showed it to Chris last night and he said "It looks like something that would be on a bed in Mamo's house."  I laughed because I thought the same thing.  I purposefully kept it very scrappy with no intentional design as far as colors go.  I did try to make sure matching fabrics didn't touch, but I saw it happened a few times and I'm okay with that.  So this one won't win any awards for design, but it will keep us all very warm once completed and I like that it looks like something my very talented grandmother would have made.  The fabrics are partly hers, anyway, right?

A view from the other end...pretty scrappy, huh?
I'm considering a royal blue for the border and possibly backing.  I've got yardage in a Kona blue that I used on another project.  Chris thought it should have a red border (and I initially agreed), but I don't have enough of any one red and since the whole patchwork part is scraps, I hate to go buy fabric for the border and backing if I can avoid it.  Any ideas?  When you've got every color under the sun, how do you decide on one for border strips?  But I agree with Chris that a simple border will help frame in the madness of this one.  And I believe the binding will be scrappy.  Why not?  I've got extra strips cut that I didn't use, so why not use them here to finish it off.

I'm entering this one in Rachel's flickr group for the quilt-a-long.  I got done a little late, but she extended the deadline, so I'm entering it today.  It's a perfect day for sewing.  It's raining cats and dogs.  All we are getting from this blizzard that's hitting the country is a torrential downpour.  Bad enough, but after seeing what the rest of the country got hit with, I'll take some rain any day!  For those up north, stay warm and for those down here in FL, stay dry!  How about this--for everyone--stay inside as much as you can today and let's all hope that groundhog was right...I'm ready for some spring!